CEPH Configuration
1. Overview
This document provides step-by-step instructions for integrating Ceph Object Storage (RADOS Gateway) with StackBill cloud management platform. The integration enables end users to utilize S3-compatible object storage services through the StackBill interface.
What You Will Achieve:
- Configure Ceph RGW for external access
- Set up secure HTTPS access with wildcard certificates
- Enable bucket-style DNS access (e.g.,
https://bucket-name.s3.xxxy.com) - Integrate Ceph with StackBill for user provisioning and billing
2. Prerequisites
| Requirement | Description |
|---|---|
| Ceph Cluster | A running Ceph cluster with RADOS Gateway (RGW) deployed |
| StackBill | StackBill admin panel access with administrator privileges |
| Domain | A registered domain (e.g., xxxy.com) with DNS management access |
| SSL Certificate | Wildcard SSL certificate for *.s3.xxxy.com |
| Network | Network connectivity between StackBill and Ceph RGW endpoints |
3. Part 1: Ceph Configuration
This section covers all the necessary configurations on the Ceph cluster side before integrating with StackBill.
3.1 Create RGW User with System User Flag
The system user flag is required for StackBill to perform administrative operations like user management and quota configuration.
Step 1: Create the RGW System User��
Run the following command on your Ceph admin node:
radosgw-admin user create --uid="stackbill-admin" --display-name="StackBill Admin User" --system
Replace stackbill-admin with your preferred username. The --system flag grants administrative privileges
Step 2: Save the Access Credentials
The command output will display the access key and secret key. Save these credentials securely as they will be needed for StackBill configuration.
Example Output:
{
    "user_id": "stackbill-admin",
    "display_name": "StackBill Admin User",
    "keys": [
        {
            "user": "stackbill-admin",
            "access_key": "XXXXXXXXXXXXXXXXXXXX",
            "secret_key": "XXXXXXXXXXXXXXXXXXXXXXXXXXXXXXXXXXXXXXXX"
        }
    ],
    "system": "true"
}
Store the access_key and secret_key in a secure location. These credentials will be required in Part 2 for StackBill configuration.
Step 3: Verify the User Creation
Confirm the user was created successfully with system privileges:
radosgw-admin user info --uid="stackbill-admin"
Verify that "system": "true" appears in the output.
3.2 Configure RGW DNS Name
Configure the rgw_dns_name parameter to enable bucket-style subdomain access.
Step 1: Set RGW DNS Configuration
Set the RGW DNS configuration using the Ceph CLI:
ceph config set client.rgw rgw_dns_name s3.xxxy.com
ceph config set client.rgw rgw_resolve_cname true
Replace s3.xxxy.com with your actual domain.
Step 2: Restart the RGW Service
Apply the configuration changes by restarting the RGW service:
sudo systemctl restart ceph-radosgw@rgw.<instance-name>
Or for all RGW instances:
sudo systemctl restart ceph-radosgw.target
Step 3: Verify the Configuration
Confirm the DNS name configuration is active:
ceph config get client.rgw rgw_dns_name
Expected output: s3.xxxy.com
3.3 Wildcard SSL Certificate Setup
Step 1: Obtain Wildcard Certificate
You need a wildcard SSL certificate for *.s3.xxxy.com. You can obtain this from:
- Commercial Certificate Authority (DigiCert, Comodo, etc.)
- Let's Encrypt (free, using DNS challenge)
- Internal CA (for private deployments)
Example using Let's Encrypt with Certbot:
sudo certbot certonly --manual --preferred-challenges dns \
    -d "*.s3.xxxy.com" -d "s3.xxxy.com"
Step 2: Prepare Certificate Files
Ensure you have the following files ready:
- Certificate file: Contains your certificate (e.g.,
fullchain.pem) - Private key file: Contains your private key (e.g.,
privkey.pem)
Step 3: Configure RGW with SSL
Update your Ceph configuration to use the SSL certificate using Ceph CLI:
ceph config set client.rgw rgw_frontends "beast port=80 ssl_port=443 ssl_certificate=/etc/ceph/ssl/fullchain.pem ssl_private_key=/etc/ceph/ssl/privkey.pem"
Step 4: Restart RGW and Verify SSL
Restart the RGW service and test HTTPS access:
sudo systemctl restart ceph-radosgw.target

# Test SSL connection
curl -I https://s3.xxxy.com
3.4 DNS Records Configuration
Step 1: Create DNS Records
Configure the following DNS records in your DNS management panel:
| Record Type | Name/Host | Value/Target | TTL |
|---|---|---|---|
| A Record | s3.xxxy.com | < RGW Server IP Address > | 300 |
| CNAME | *.s3.xxxy.com | s3.xxxy.com | 300 |
Replace <RGW Server IP Address> with the actual IP address of your RGW server or load balancer.
Step 2: Verify DNS Resolution
Test the DNS configuration:
# Test main domain
nslookup s3.xxxy.com

# Test wildcard subdomain
nslookup test-bucket.s3.xxxy.com
Both queries should resolve to the same IP address.
Step 3: Test Bucket Access Format
Once DNS propagates, buckets will be accessible using:
- Path style:
https://s3.xxxy.com/bucket-name - Virtual-hosted style:
https://bucket-name.s3.xxxy.com
4. Part 2: StackBill Configuration
This section covers the configuration steps in the StackBill Admin Panel to integrate with the Ceph object storage configured in Part 1.
4.1 Access Object Storage in Admin Panel
Step 1: Login to StackBill Admin Panel
Open your web browser and navigate to your StackBill Admin Panel URL. Log in with your administrator credentials.
Step 2: Navigate to Object Storage
From the main dashboard, navigate to:
Home > Addon Services > Object Storage
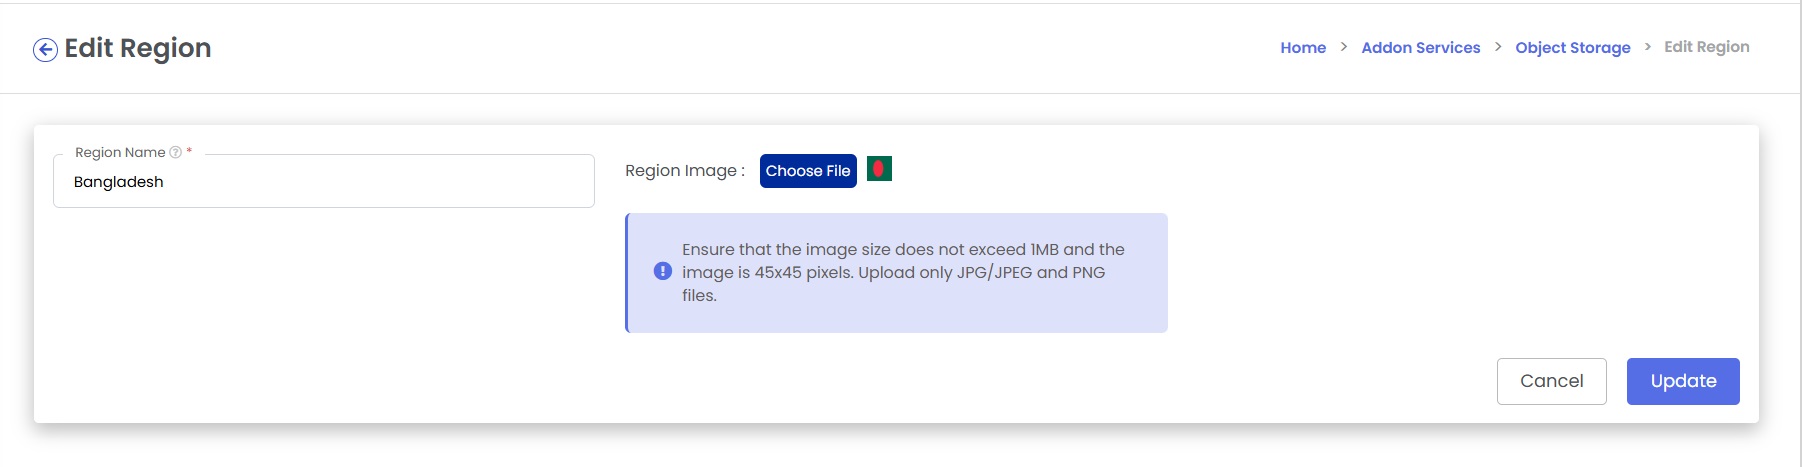
4.2 Configure Region
Before adding a zone, you need to configure a Region. The Region is a client-facing identifier that helps users identify the storage location.
Step 1:
Navigate to the Region settings and configure the following:
| Field | Description | Example Value |
|---|---|---|
| Region Name | A client-facing name for the storage region. This helps users identify the geographical or logical location of the storage. | Bangladesh, India, US-East, Singapore |
| Region Image | Upload an image/icon to represent the region (optional). Image must be 45x45 pixels and less than 1MB. Supported formats: JPG, JPEG, PNG. | Country flag or custom icon |
Step 2: Save Region Configuration
- Enter the Region Name (e.g., "Bangladesh")
- Optionally, click Choose File to upload a region image
- Click Update to save the region configuration
The Region Name is for client reference only and is not related to Ceph's internal region configuration.
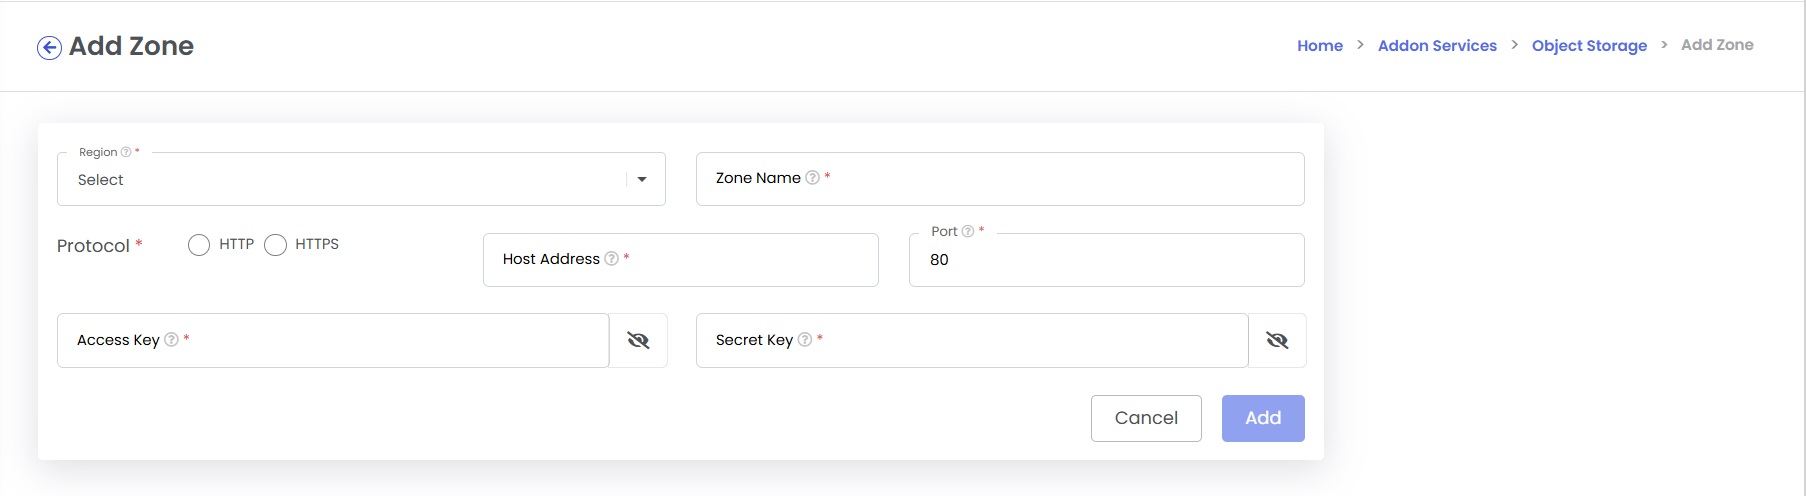
4.3 Add Zone with Ceph Details
The Zone configuration connects StackBill to your Ceph RGW cluster using the credentials generated in Part 1.
Step 1: Navigate to Add Zone
Go to Home > Addon Services > Object Storage > Add Zone
Step 2: Configure Zone Details
Fill in the following fields:
| Field | Description | Value |
|---|---|---|
| Region | Select the region you configured in the previous step from the dropdown | Select from dropdown |
| Zone Name | A friendly name for clients to identify this storage zone | Primary-Zone, Production-Zone, etc. |
| Protocol | Select the connection protocol | HTTP or HTTPS (select HTTPS for secure connections) |
| Host Address | The RGW endpoint address (without protocol prefix) | s3.xxxy.com |
| Port | The port number for the RGW service | 80 (HTTP) or 443 (HTTPS) |
| Access Key | The access key from the RGW system user created in Section 3.1 | (From Step 3.1) |
| Secret Key | The secret key from the RGW system user created in Section 3.1 | (From Step 3.1) |
Use the access_key and secret_key from the RGW system user created in Section 3.1. These credentials must have the --system flag enabled.
Section 3.1. These credentials must have the --system flag enabled.
Step 3: Save Zone Configuration
- Review all entered information
- Click Add to create the zone
The Zone Name is purely for client reference within StackBill and is not related to Ceph zones.
4.4 Configure Pricing Plan
Configure the billing plan to define how users will be charged for object storage usage.
Step 1: Navigate to Pricing Configuration
In the Object Storage settings, locate the Pricing Configuration section.
Step 2: Configure Pricing Parameters
Fill in the following billing parameters:
| Field | Description | Example Value |
|---|---|---|
| Name | A name for this pricing plan | Demo-Plan, Standard-Plan, Premium-Plan |
| Plan cost per month ($) | Fixed monthly cost for the plan (set to 0 for usage-based billing only) | 0 |
| Storage Size Free GB / Month | Amount of free storage included per month before additional charges apply | 100 |
| Bandwidth Free GB / Month | Amount of free data transfer included per month | 0 |
| Additional Storage Cost per GB ($) | Cost per GB for storage exceeding the free tier | 0.023 |
| Additional Bandwidth Cost per GB ($) | Cost per GB for data transfer exceeding the free tier | 0.09 |
Step 3: Save Pricing Configuration
- Review all pricing parameters
- Click Update to save the configuration

Step 4: Verify Service Availability
Once the setup is complete:
- The Object Storage service will be available to end users
- Users can create buckets and manage objects through the StackBill user portal
- Billing will be calculated based on the configured pricing plan
5. Verification and Testing
5.1 End-to-End Test
Perform the following tests to verify the integration:
Test 1: Create a Test Bucket via StackBill
- Log in to StackBill as an end user
- Navigate to Object Storage service
- Create a new bucket (e.g., "test-bucket")
- Verify the bucket appears in the list
Test 2: Verify Bucket Access via DNS
# Test bucket access using virtual-hosted style URL
curl -I https://test-bucket.s3.xxxy.com
Test 3: Upload and Download Test
- Upload a test file to the bucket
- Download the file and verify integrity
- Check that usage metrics update in StackBill
6. Troubleshooting
Common Issues and Solutions
| Issue | Possible Cause | Solution |
|---|---|---|
| StackBill cannot connect to Ceph | Network/Firewall blocking connection | Verify port 80/443 is open between StackBill and RGW |
| SSL certificate errors | Certificate not trusted or expired | Verify certificate validity and trust chain |
| Bucket subdomain not resolving | DNS not propagated or misconfigured | Verify CNAME record and wait for DNS propagation |
| Access denied errors | System user flag not enabled | Verify user has --system flag using radosgw-admin user info |
| Users cannot create buckets | Quota or permission issues | Check user quotas and RGW system user permissions |